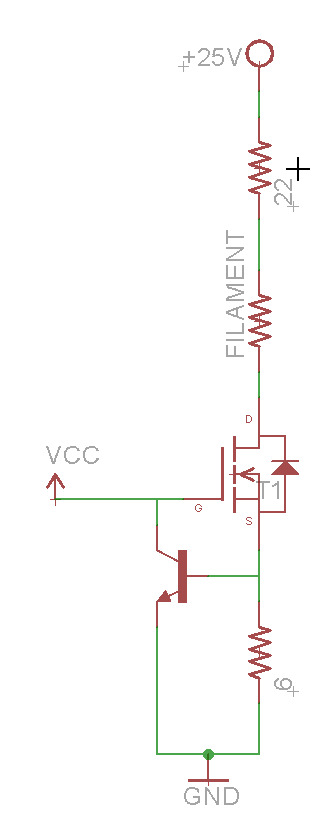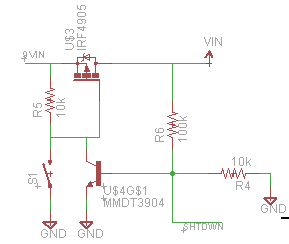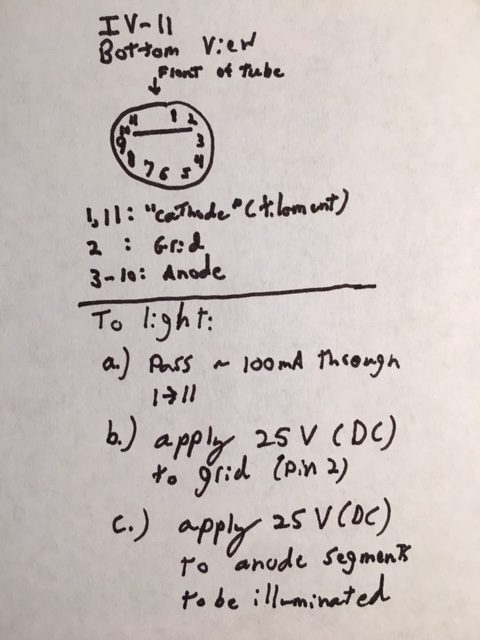
Processor
Okay, so the one piece of hardware that hasn’t been much discussed in this chain is the processor. I chose an atmega 328p for a couple of reasons:
- I can use the massive stock of Arduino libraries and IDE. For a simple project like this, where the complexity management of “adult” IDEs won’t be very useful, it’s the right tool for the job.
- I happen to have a USBTiny ISP board for in circuit programming. By dropping the atmega into the socket on an Arduino UNO and using its ISP port, I can program the micro without assembling ISP pins on my breadboard.
- I had a drawer full of atmega 328Ps.
With the decision made, I set out to use the atmega on a breadboard, as laid out here. Since I’m lazy and didn’t want to lay down a crystal or capacitors, and I need next to no performance, I opted to use the internal 8MHz oscillator.
Unlike the tutorial, I simply socketed the atmega into an unused UNO and plugged it in to my Sparkfun AVR Programmer. After burning the bootloader and program, I dropped it in to my breadboard and went with it. This is the first time I’ve used the 8MHz oscillator and it did exactly what it said on the tin.
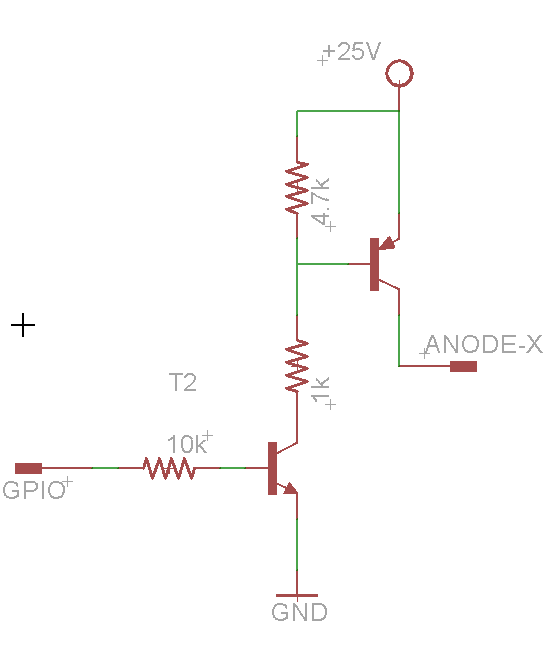
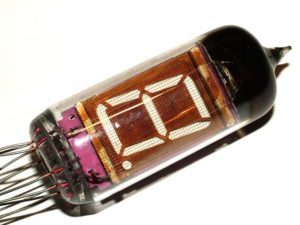
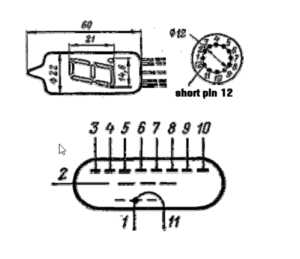
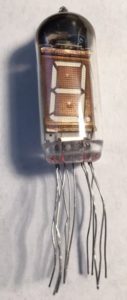
VFD Support
To drive the VFD, I initially tried to use a pre-made seven segment library, SevenSeg. Despite the fact that it looks like it should work, I couldn’t get it to turn on the display. Given that I wasn’t using any of the complex features, like multiplexing, I decided to save time bit-bang the pins myself.
The resulting functions were as follows:
#define SEG_A 0
#define SEG_B 1
#define SEG_C 2
#define SEG_D 3
#define SEG_E 4
#define SEG_F 5
#define SEG_G 6
#define SEG_DP 7
#define PWR 12
int pinDefinitions[8] = {SEG_A, SEG_B, SEG_C, SEG_D, SEG_E, SEG_F, SEG_G, SEG_DP}; //array of pin segments
byte charArray[10] = { //array of segments to light up for each digit 0-9
  0b11111100,
  0b01100000,
  0b11011010,
  0b11110010,
  0b01100110,
  0b10110110,
  0b10111110,
  0b11100000,
  0b11111110,
  0b11100110
};
void initSegPins(int* pins) //initialize the pins
{
  for(int i = 0; i < 8; i++)
  {
    pinMode(pins[i], OUTPUT);
  }
}

void setDisplay(int num, int* pins) //draw a digit 0-9 on pins
{
  num = num % 10;
  byte segments = 0x00;
  writeArb(charArray[num], pins);

}

void writeArb(byte segments, int* pins) //draw an arbitrary byte on pins
{
  for(int i = 0; i < 8; i++)
  {
    digitalWrite(pins[i], (segments>>(7-i))&0x01);
  }
}
void setDisplay(char c, int* pins) //draw a character on the pins
{
  if((c > 0x2F) && (c < 0x3A)) //digit 0-9
  {
    setDisplay((int) c - 0x30, pins);
  }
  else
  {
    switch(c) {
      case 'f':
      case 'F':
        writeArb(0b10001110, pins);
        break;
      case 'c':
        writeArb(0b00011010, pins);
        break;
      case 'C':
        writeArb(0b10011100, pins);
        break;
      case 'd':
        writeArb(0b01111010, pins);
        break;
      case 'D':
        writeArb(0b11000110, pins);
        break;
      case 'h':
        writeArb(0b00101110, pins);
        break;
      case 'H':
        writeArb(0b01101110, pins);
        break;
      case 'b':
        writeArb(0b00000000, pins);
        break;
    };
  }
}
void printNum(float num, int* pins, int delayLen = 500) //print a number up to 999, rounded to nearest int
{
  num = round(num);
  if(num > 100)
  {
    setDisplay(int(floor(num/100))%1000, pins);
    delay(delayLen);
  }
  if(num > 10)
  {
    setDisplay(int(floor(num/10))%100, pins);
    delay(delayLen);
  }
  setDisplay(int(floor(num))%10, pins);
  delay(delayLen);
}
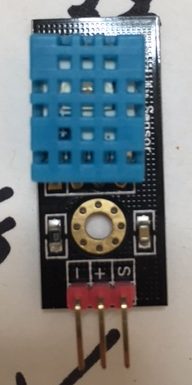
Temperature Sensor
The final piece of the puzzle was the DHT11 temperature sensor. Since I didn’t have one on hand, this represented the only cash expenditure for this project — $10 at Fry’s. I grabbed on OSEPP DHT11 breakout board, since it was what they had. It had the advantage of getting humidity as well, so I made the program report that in addition to temperature. Fortunately, Adafruit also sells DHT11s, so I was able to use their library, although I did need to also install their general sensor library. These libraries are the real perk of using the Arduino environment, admittedly.
The final code for the entire program is here:
#include "DHT.h"

#define DHTPIN 13     // what digital pin we're connected to

// Uncomment whatever type you're using!
#define DHTTYPE DHT11   // DHT 11

// Initialize DHT sensor.
// Note that older versions of this library took an optional third parameter to
// tweak the timings for faster processors.  This parameter is no longer needed
// as the current DHT reading algorithm adjusts itself to work on faster procs.
DHT dht(DHTPIN, DHTTYPE);


#define SEG_A 0
#define SEG_B 1
#define SEG_C 2
#define SEG_D 3
#define SEG_E 4
#define SEG_F 5
#define SEG_G 6
#define SEG_DP 7
#define PWR 12
int pinDefinitions[8] = {SEG_A, SEG_B, SEG_C, SEG_D, SEG_E, SEG_F, SEG_G, SEG_DP}; //array of pin segments
byte charArray[10] = { //array of segments to light up for each digit 0-9
  0b11111100,
  0b01100000,
  0b11011010,
  0b11110010,
  0b01100110,
  0b10110110,
  0b10111110,
  0b11100000,
  0b11111110,
  0b11100110
};
void initSegPins(int* pins) //initialize the pins
{
  for(int i = 0; i < 8; i++)
  {
    pinMode(pins[i], OUTPUT);
  }
}

void setDisplay(int num, int* pins) //draw a digit 0-9 on pins
{
  num = num % 10;
  byte segments = 0x00;
  writeArb(charArray[num], pins);

}

void writeArb(byte segments, int* pins) //draw an arbitrary byte on pins
{
  for(int i = 0; i < 8; i++)
  {
    digitalWrite(pins[i], (segments>>(7-i))&0x01);
  }
}
void setDisplay(char c, int* pins) //draw a character on the pins
{
  if((c > 0x2F) && (c < 0x3A)) //digit 0-9
  {
    setDisplay((int) c - 0x30, pins);
  }
  else
  {
    switch(c) {
      case 'f':
      case 'F':
        writeArb(0b10001110, pins);
        break;
      case 'c':
        writeArb(0b00011010, pins);
        break;
      case 'C':
        writeArb(0b10011100, pins);
        break;
      case 'd':
        writeArb(0b01111010, pins);
        break;
      case 'D':
        writeArb(0b11000110, pins);
        break;
      case 'h':
        writeArb(0b00101110, pins);
        break;
      case 'H':
        writeArb(0b01101110, pins);
        break;
      case 'b':
        writeArb(0b00000000, pins);
        break;
    };
  }
}
void printNum(float num, int* pins, int delayLen = 500) //print a number up to 999, rounded to nearest int
{
  num = round(num);
  if(num > 100)
  {
    setDisplay(int(floor(num/100))%1000, pins);
    delay(delayLen);
  }
  if(num > 10)
  {
    setDisplay(int(floor(num/10))%100, pins);
    delay(delayLen);
  }
  setDisplay(int(floor(num))%10, pins);
  delay(delayLen);
}
void setup() {
  // put your setup code here, to run once:
  initSegPins(pinDefinitions);
  digitalWrite(PWR, HIGH);
  pinMode(PWR, OUTPUT);
  dht.begin();
  delay(500);

// Read temperature as Fahrenheit (isFahrenheit = true)
  float f = dht.readTemperature(true);
  printNum(f, pinDefinitions);
  //print degree symbol and F
  setDisplay('D', pinDefinitions);
  delay(500);
  setDisplay('f', pinDefinitions);
  delay(500);

  //blank display
  setDisplay('b', pinDefinitions);
  delay(500);

  float h = dht.readHumidity(); //humidity
  printNum(h, pinDefinitions);
  setDisplay('H', pinDefinitions);
  delay(500);

  //turn off system
  digitalWrite(PWR, LOW);

}


void loop() {

}
Conclusion
So, what does the final project look like? Like this!
What is it showing? The temperature (two digits), then the degrees symbol and F. This is followed by a pause, then it reports percent humidity and the letter H (for humidity).
That’s all folks! Hope you enjoyed the read. On to the next project.